php-ksip-telnet
A PHP library for managing FreePBX/Asterisk PJSIP extensions remotely via SSH.
Requirements
- PHP >= 7.4
- Composer
- FreePBX / Asterisk server with SSH access
Installation
composer require codego/php-ksip-telnetUsage
1. Connect to SSH
<?php

require 'vendor/autoload.php';

use KsipTelnet\SSHClient;

$client = new SSHClient();

// Default port 22
$client->connect('your-server-ip', 'root', 'your-password');

// Custom port
$client->connect('your-server-ip', 'root', 'your-password', 2222);
2. Create a PJSIP Extension
$result = $client->createExtensionKsip(
    '1001',          // extension number
    'secret123',     // extension password
    'freepbxuser',   // MySQL username
    'dbpassword'     // MySQL password
);

echo $result['sql_output'];
echo $result['reload_output'];
3. Get All Extensions
$extensions = $client->getExtKsipList('freepbxuser', 'dbpassword');
// returns: ['1001', '1002', '1003', ...]
4. Generate Extension if Not Exists
$result = $client->genExtKsip(
    [
        'extName'  => '1005',
        'password' => 'secret123'  // optional, defaults to extName
    ],
    'freepbxuser',
    'dbpassword'
);

// If extension already exists:
// ['status' => 'exists', 'extension' => '1005', 'message' => 'Extension 1005 already exists']

// If extension was created:
// ['status' => 'created', 'extension' => '1005', 'result' => [...]]
5. Run a Custom SSH Command
$output = $client->exec('asterisk -rx "pjsip show endpoints"');
echo $output;
Environment Variables (Recommended)
Instead of hardcoding credentials, use environment variables:
export SSH_HOST=your-server-ip
export SSH_USER=root
export SSH_PASS=your-password
export SSH_PORT=22
$client->connect(
getenv('SSH_HOST'),
getenv('SSH_USER'),
getenv('SSH_PASS'),
getenv('SSH_PORT') ?: 22
);Laravel Integration
Install the package
composer require codego/php-ksip-telnetAdd credentials to .env
SSH_HOST=your-server-ip
SSH_USER=root
SSH_PASS=your-password
SSH_PORT=22
SSH_DB_USER=freepbxuser
SSH_DB_PASS=dbpasswordCreate a Service class
php artisan make:service FreePBXService<?php
namespace App\Services;
use KsipTelnet\SSHClient;
class FreePBXService
{
protected SSHClient $client;
public function __construct()
{
$this->client = new SSHClient();
$this->client->connect(
config('services.freepbx.host'),
config('services.freepbx.user'),
config('services.freepbx.pass'),
config('services.freepbx.port', 22)
);
}
public function createExtensionKsip(string $ext, string $password): array
{
return $this->client->createExtensionKsip(
$ext, $password,
config('services.freepbx.db_user'),
config('services.freepbx.db_pass')
);
}
public function getExtKsipList(): array
{
return $this->client->getExtKsipList(
config('services.freepbx.db_user'),
config('services.freepbx.db_pass')
);
}
public function genExtKsip(array $data): array
{
return $this->client->genExtKsip(
$data,
config('services.freepbx.db_user'),
config('services.freepbx.db_pass')
);
}
public function exec(string $command): string
{
return $this->client->exec($command);
}
}Register in config/services.php
'freepbx' => [
    'host'    => env('SSH_HOST'),
    'user'    => env('SSH_USER'),
    'pass'    => env('SSH_PASS'),
    'port'    => env('SSH_PORT', 22),
    'db_user' => env('SSH_DB_USER'),
    'db_pass' => env('SSH_DB_PASS'),
],Bind in AppServiceProvider
use App\Services\FreePBXService;

public function register(): void
{
    $this->app->singleton(FreePBXService::class);
}Use in a Controller
php artisan make:controller ExtensionController<?php
namespace App\Http\Controllers;
use App\Services\FreePBXService;
use Illuminate\Http\Request;
class ExtensionController extends Controller
{
public function __construct(protected FreePBXService $freepbx) {}
public function store(Request $request)
{
$request->validate([
'extension' => 'required|numeric',
'password' => 'required|string',
]);
return response()->json(
$this->freepbx->createExtensionKsip($request->extension, $request->password)
);
}
public function index()
{
return response()->json($this->freepbx->getExtKsipList());
}
public function generate(Request $request)
{
$request->validate([
'extName' => 'required|numeric',
'password' => 'nullable|string',
]);
return response()->json(
$this->freepbx->genExtKsip($request->only('extName', 'password'))
);
}
}Add routes in routes/api.php
use App\Http\Controllers\ExtensionController;

Route::get('/extensions', [ExtensionController::class, 'index']);
Route::post('/extensions', [ExtensionController::class, 'store']);
Route::post('/extensions/generate', [ExtensionController::class, 'generate']);Test via API
curl -X POST http://your-app.com/api/extensions \
  -H "Content-Type: application/json" \
  -d '{"extension": "1001", "password": "secret123"}'
make:ksip-config — Per-User Softphone Settings
Generates a migration, model, controller, and API routes so each authenticated user can save and retrieve their own softphone configuration from the database.
php artisan make:ksip-config
php artisan migrate
What it generates
database/migrations/{timestamp}_create_softphone_configs_table.phpapp/Models/SoftphoneConfig.phpapp/Http/Controllers/Api/SoftphoneConfigController.php- Appends routes to
routes/api.php
Migration Schema
Schema::create('softphone_configs', function (Blueprint $table) {
    $table->id();
    $table->foreignId('user_id')->constrained()->onDelete('cascade');

    // SIP Connection
    $table->string('server')->nullable();
    $table->enum('ws_protocol', ['ws', 'wss'])->default('ws');
    $table->string('ws_port')->default('8088');
    $table->string('extension')->nullable();
    $table->string('password')->nullable();
    $table->string('display_name')->nullable();

    // Codecs
    $table->json('audio_codecs')->nullable();
    $table->json('video_codecs')->nullable();

    // UI Toggles
    $table->boolean('enabled_bubble')->default(true);
    $table->boolean('show_dialer')->default(true);
    $table->boolean('show_setting')->default(true);
    $table->boolean('show_opacity')->default(true);
    $table->boolean('answer_with_video_call')->default(false);
    $table->boolean('show_incoming_call_video_btn')->default(true);
    $table->boolean('show_incoming_call_audio')->default(true);
    $table->boolean('fullscreen')->default(false);

    // Recording
    $table->boolean('auto_record')->default(false);
    $table->string('recording_dir')->default('video/recordings/Ksip');
    $table->string('upload_api_url')->nullable();

    // Position
    $table->integer('position_top')->nullable();
    $table->integer('position_bottom')->nullable();
    $table->integer('position_left')->nullable();
    $table->integer('position_right')->nullable();

    $table->unique('user_id'); // one config per user
    $table->timestamps();
});
Generated API Routes
Route::middleware(['auth:sanctum,web'])->group(function () {
    Route::get('/softphone-config',  [SoftphoneConfigController::class, 'show']);
    Route::post('/softphone-config', [SoftphoneConfigController::class, 'save']);
});| Method | Endpoint | Description |
|---|---|---|
| GET | /api/softphone-config |
Get the authenticated user's config |
| POST | /api/softphone-config |
Save / update the authenticated user's config |
Save Config Example
curl -X POST http://your-app.com/api/softphone-config \
  -H "Authorization: Bearer {token}" \
  -H "Content-Type: application/json" \
  -d '{
    "server": "192.168.1.100",
    "ws_protocol": "ws",
    "ws_port": "8088",
    "extension": "1001",
    "password": "mypassword",
    "display_name": "Juan Luna",
    "audio_codecs": ["PCMU", "PCMA"],
    "video_codecs": ["VP8", "H264"],
    "auto_record": true
  }'
React Integration — configApiUrl prop
Pass the API endpoint and Bearer token to the Softphone component. It fetches the user's saved config on mount and falls back to built-in defaults if the API returns null.
<Softphone
  configApiUrl="/api/softphone-config"
  configApiToken={userToken}
/>{ "data": null } (no saved config yet), the component automatically uses its built-in default values — no extra setup needed.API Response Format
{
  "data": {
    "id": 1,
    "user_id": 42,
    "server": "192.168.1.100",
    "ws_protocol": "ws",
    "ws_port": "8088",
    "extension": "1001",
    "password": "mypassword",
    "display_name": "Juan Luna",
    "audio_codecs": ["PCMU", "PCMA"],
    "video_codecs": ["VP8", "H264"],
    "enabled_bubble": true,
    "show_dialer": true,
    "show_setting": true,
    "show_opacity": true,
    "answer_with_video_call": false,
    "show_incoming_call_video_btn": true,
    "show_incoming_call_audio": true,
    "fullscreen": false,
    "auto_record": true,
    "recording_dir": "video/recordings/Ksip",
    "upload_api_url": null,
    "position_top": null,
    "position_bottom": 20,
    "position_left": null,
    "position_right": 20
  }
}
make:ksip — Create Extension via CLI
Create a FreePBX PJSIP extension directly from the terminal without writing any PHP code.
php artisan make:ksip --extension="1001" --name="Juan Luna" --secret="mypassword"--secret is optional. If omitted, the extension number is used as the password automatically.
php artisan make:ksip --extension="1001" --name="Juan Luna"
# Password defaults to: 1001
Options
| Option | Required | Description |
|---|---|---|
--extension | ✓ Yes | The PJSIP extension number |
--name | ✓ Yes | Display name / Caller ID |
--secret | ✗ No | SIP password (defaults to extension number) |
Prerequisites
Make sure config/services.php has the freepbx block and your .env is set:
SSH_HOST=your-server-ip
SSH_USER=root
SSH_PASS=your-password
SSH_PORT=22
SSH_DB_USER=freepbxuser
SSH_DB_PASS=dbpassword
'freepbx' => [
'host' => env('SSH_HOST'),
'user' => env('SSH_USER'),
'pass' => env('SSH_PASS'),
'port' => env('SSH_PORT', 22),
'db_user' => env('SSH_DB_USER'),
'db_pass' => env('SSH_DB_PASS'),
],Auto Extension Registration
Automatically generates a unique 12-digit extension number from a user's name acronym + birthdate, then registers it in FreePBX. Can run as a cron job or be called directly from a controller.
Extension Number Formula
Each initial letter is converted to its alphabet position (A=01 … Z=26, zero-padded to 2 digits), then the birthdate is appended as mmddyy. If the total is less than 12 digits, random digits fill the remainder.
| Part | Example | Result |
|---|---|---|
| Last name initial — L (12th letter) | Luna | 12 |
| First name initial — J (10th letter) | Juan | 10 |
| Middle name initial — M (13th letter) | Mercado | 13 |
| Birthdate (mmddyy) | 12/16/1996 | 121696 |
| Final Extension | 121013121696 |
Scaffold the cron job
php artisan make:ksip-register-userGenerates app/Console/Commands/AssignExtensionToUsers.php and appends the schedule entry to routes/console.php.
Add to .env
SSH_HOST=your-server-ip
SSH_USER=root
SSH_PASS=your-password
SSH_PORT=22
SSH_DB_USER=freepbxuser
SSH_DB_PASS=dbpasswordRun the scheduler
# Run once manually
php artisan ksip:assign-extensions

# Or let the scheduler handle it every minute
php artisan schedule:runProduction: Auto-run via Supervisor
In production, use Supervisor to keep the scheduler running automatically — no need to manually trigger it every minute.
1. Install Supervisor
sudo apt install supervisor2. Create config file
sudo nano /etc/supervisor/conf.d/laravel-scheduler.conf[program:laravel-scheduler]
process_name=%(program_name)s
command=bash -c "while true; do php /var/www/your-project/artisan schedule:run; sleep 60; done"
autostart=true
autorestart=true
user=www-data
redirect_stderr=true
stdout_logfile=/var/www/your-project/storage/logs/scheduler.log/var/www/your-project with your actual project path and www-data with your server user (e.g. ubuntu, forge, deployer).3. Start Supervisor
sudo supervisorctl reread
sudo supervisorctl update
sudo supervisorctl start laravel-scheduler
4. Check status
sudo supervisorctl status laravel-schedulerSupervisor will automatically restart the scheduler if the server reboots or the process crashes. Logs are written to storage/logs/scheduler.log.
Call directly from a Registration Controller
Use SSHClient::ksipRegisterUser() to assign an extension immediately on user registration — no need to wait for the cron job.
<?php

namespace App\Http\Controllers\Auth;

use App\Models\User;
use Illuminate\Http\Request;
use KsipTelnet\SSHClient;

class RegisterController extends Controller
{
    public function register(Request $request)
    {
        $request->validate([
            'first_name'  => 'required|string',
            'last_name'   => 'required|string',
            'middle_name' => 'nullable|string',
            'birth_date'  => 'required|date',
            'email'       => 'required|email|unique:users',
            'password'    => 'required|min:8|confirmed',
        ]);

        $user = User::create([
            'first_name'  => $request->first_name,
            'last_name'   => $request->last_name,
            'middle_name' => $request->middle_name,
            'birth_date'  => $request->birth_date,
            'email'       => $request->email,
            'password'    => bcrypt($request->password),
        ]);

        $ssh = new SSHClient();
        $ssh->connect(
            config('services.freepbx.host'),
            config('services.freepbx.user'),
            config('services.freepbx.pass'),
            config('services.freepbx.port', 22)
        );

        $result = SSHClient::ksipRegisterUser(
            $user,
            $ssh,
            config('services.freepbx.db_user'),
            config('services.freepbx.db_pass')
        );

        return response()->json([
            'user'      => $user,
            'extension' => $result['extension'],
            'status'    => $result['status'],
        ], 201);
    }
}
Generate Extension Number Only (no SSH)
use KsipTelnet\SSHClient;

$ext = SSHClient::generateExtensionFromUser(
    'Luna',      // last_name
    'Juan',      // first_name
    'Mercado',   // middle_name
    '12/16/1996' // birth_date
);

// $ext → '121013121696'
Return Values of ksipRegisterUser
| status | Meaning |
|---|---|
assigned | Extension generated and registered in FreePBX |
skipped | User already has an extensionName |
error | Missing name or birthdate fields |
Artisan Scaffold Generator
The package includes a make:ksipgen command that auto-generates call recording scaffold files in your Laravel project connects to KSIP (juv-ksip-softphone) just install reacr ksip juv-ksip-softphone.
Install React KSIP
npm i juv-ksip-softphone@latestWhat it generates
app/Http/Controllers/Api/CallRecordingController.phpdatabase/migrations/{timestamp}_create_call_recordings_table.php- Appends routes to
routes/api.php
Usage
php artisan make:ksipgen
php artisan migrate
Generated Routes
Route::prefix('recordings')->group(function () {
    Route::post('/upload', [CallRecordingController::class, 'upload']);
    Route::get('/', [CallRecordingController::class, 'index']);
    Route::get('/{id}', [CallRecordingController::class, 'show']);
    Route::get('/{id}/download', [CallRecordingController::class, 'download']);
    Route::delete('/{id}', [CallRecordingController::class, 'delete']);
});
Upload Example
curl -X POST http://your-app.com/api/recordings/upload \
  -F "file=@/path/to/recording.wav" \
  -F "caller=1001" \
  -F "callee=1002" \
  -F "duration=60"
Migration Schema
Schema::create('call_recordings', function (Blueprint $table) {
    $table->id();
    $table->string('filename');
    $table->string('path');
    $table->string('caller')->nullable();
    $table->string('callee')->nullable();
    $table->integer('duration')->nullable();
    $table->timestamps();
});
Available API Endpoints
| Method | Endpoint | Description |
|---|---|---|
| GET | /api/recordings |
List all recordings |
| POST | /api/recordings/upload |
Upload a recording (mp3/wav/ogg) |
| GET | /api/recordings/{id} |
Get a single recording |
| GET | /api/recordings/{id}/download |
Download a recording |
| DELETE | /api/recordings/{id} |
Delete a recording |
SipController — Artisan Command Integration
Create extensions via HTTP API by calling the make:ksip Artisan command from a controller.
Controller Implementation
<?php

namespace App\Http\Controllers;

use Illuminate\Http\Request;
use Illuminate\Support\Facades\Artisan;

class SipController extends Controller
{
    public function createExtension(Request $request)
    {
        $request->validate([
            'extension' => 'required|string',
            'name'      => 'required|string',
            'secret'    => 'required|string',
        ]);

        // Call the Artisan command
        $exitCode = Artisan::call('make:ksip', [
            '--extension' => $request->extension,
            '--name'      => $request->name,
            '--secret'    => $request->secret,
        ]);

        // Get the output of the command
        $output = Artisan::output();

        if ($exitCode === 0) {
            return response()->json([
                'success' => true,
                'message' => "Extension {$request->extension} created successfully!",
                'output'  => $output,
            ], 201);
        }

        return response()->json([
            'success' => false,
            'message' => 'Failed to create extension',
            'output'  => $output,
        ], 500);
    }
}
Route Registration
// routes/api.php
Route::post('/sip/create-extension', [SipController::class, 'createExtension']);
API Usage
curl -X POST http://your-app.com/api/sip/create-extension \
  -H "Content-Type: application/json" \
  -d '{
    "extension": "1001",
    "name": "Juan Luna",
    "secret": "mypassword"
  }'
License
This package is open-sourced software licensed under the MIT license.
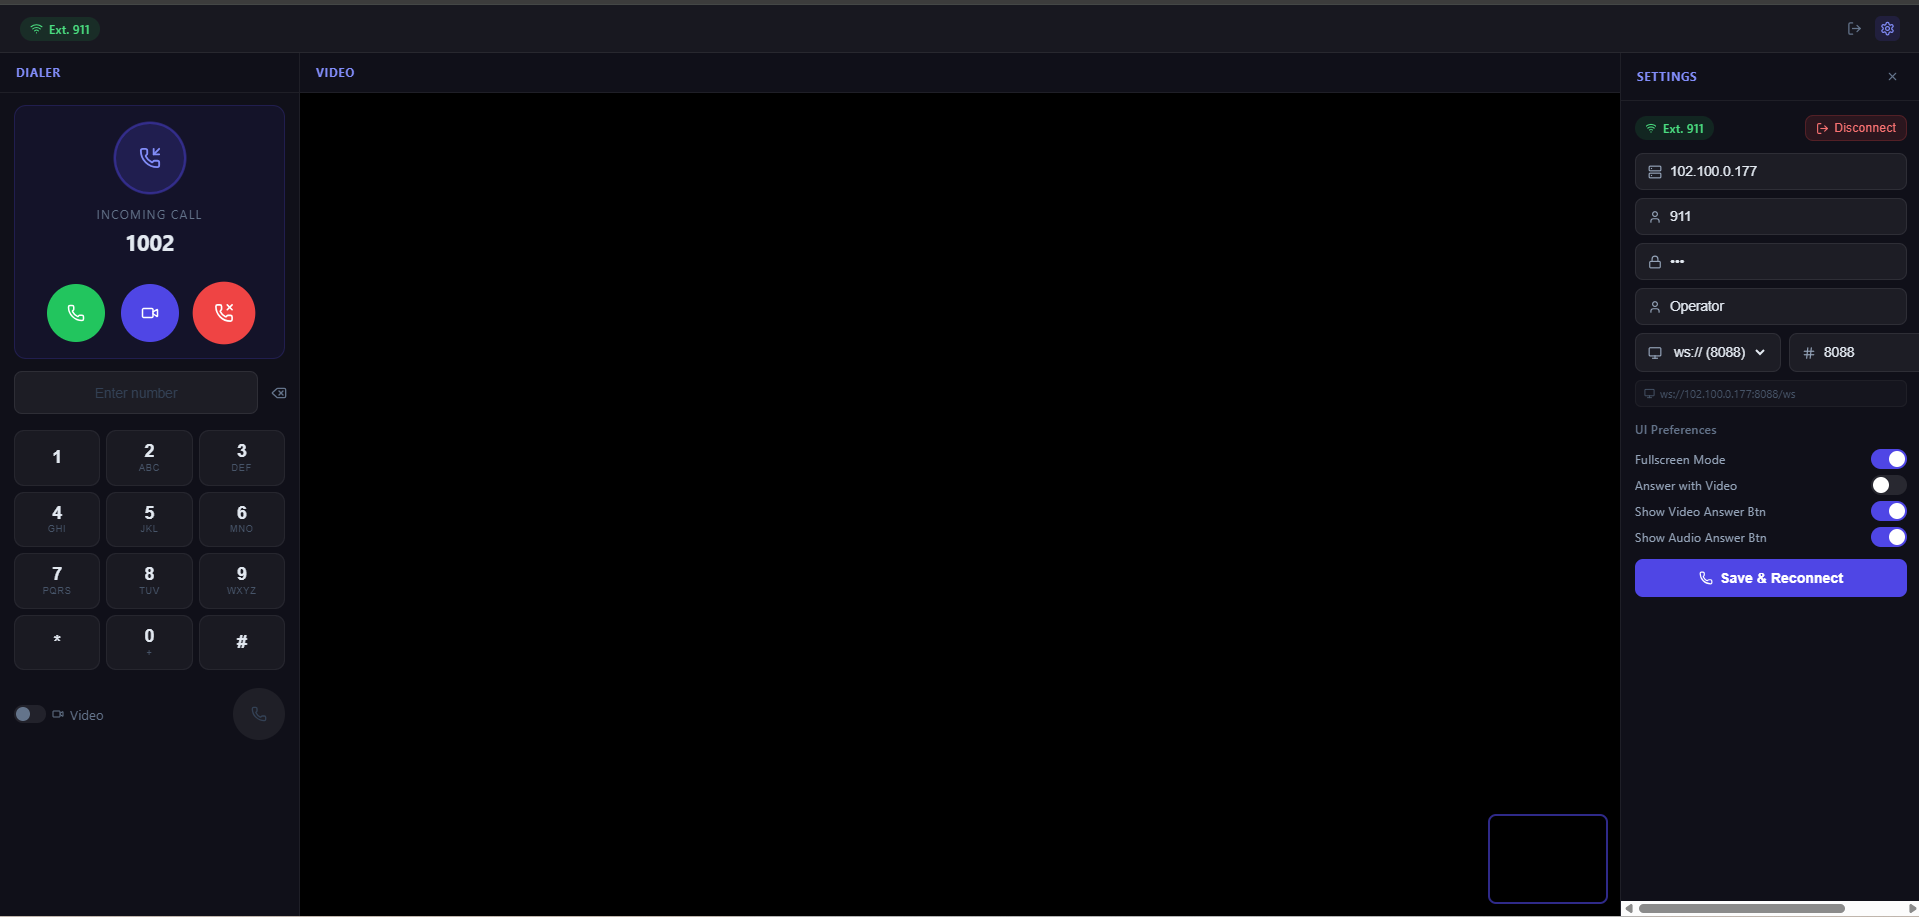
juv-ksip-softphone
A professional, draggable, resizable, transparent React WebRTC SIP softphone component for FreePBX / Asterisk. Supports audio and video calls, incoming call handling, codec selection, and a global ksipcall API for triggering calls from anywhere in your app.
How does it work?
The component connects to your FreePBX/Asterisk server via WebSocket SIP (ws:// port 8088 or wss:// port 8089). Once registered, WebRTC handles audio/video streams natively in the browser — no plugins needed.
Browser  ──WebSocket──▶  FreePBX/Asterisk  ──SIP──▶  Other Phone
           (SIP/WS)           (PBX)
Browser  ◀──WebRTC──▶   FreePBX/Asterisk  ◀──RTP──▶  Other Phone
           (Audio/Video)      (Media)
Screenshots
Features
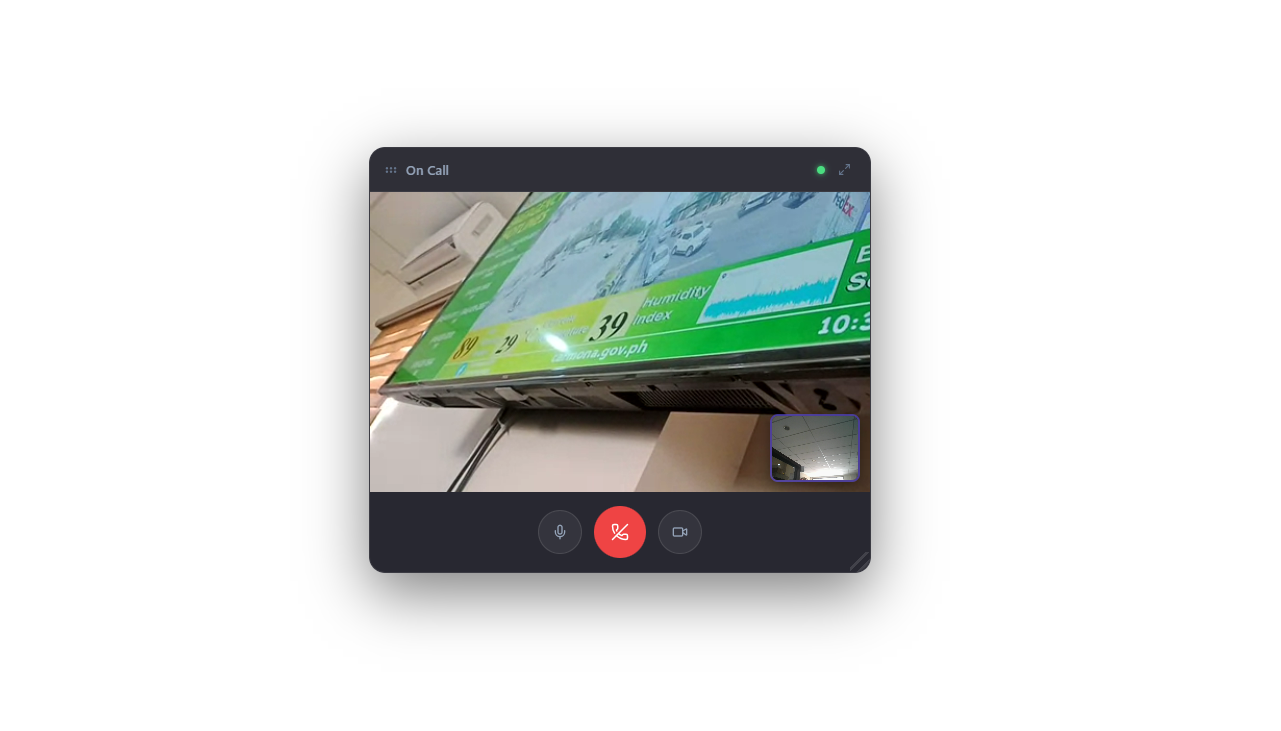
- 🎙 Audio & video calls via WebRTC + SIP (FreePBX / Asterisk)
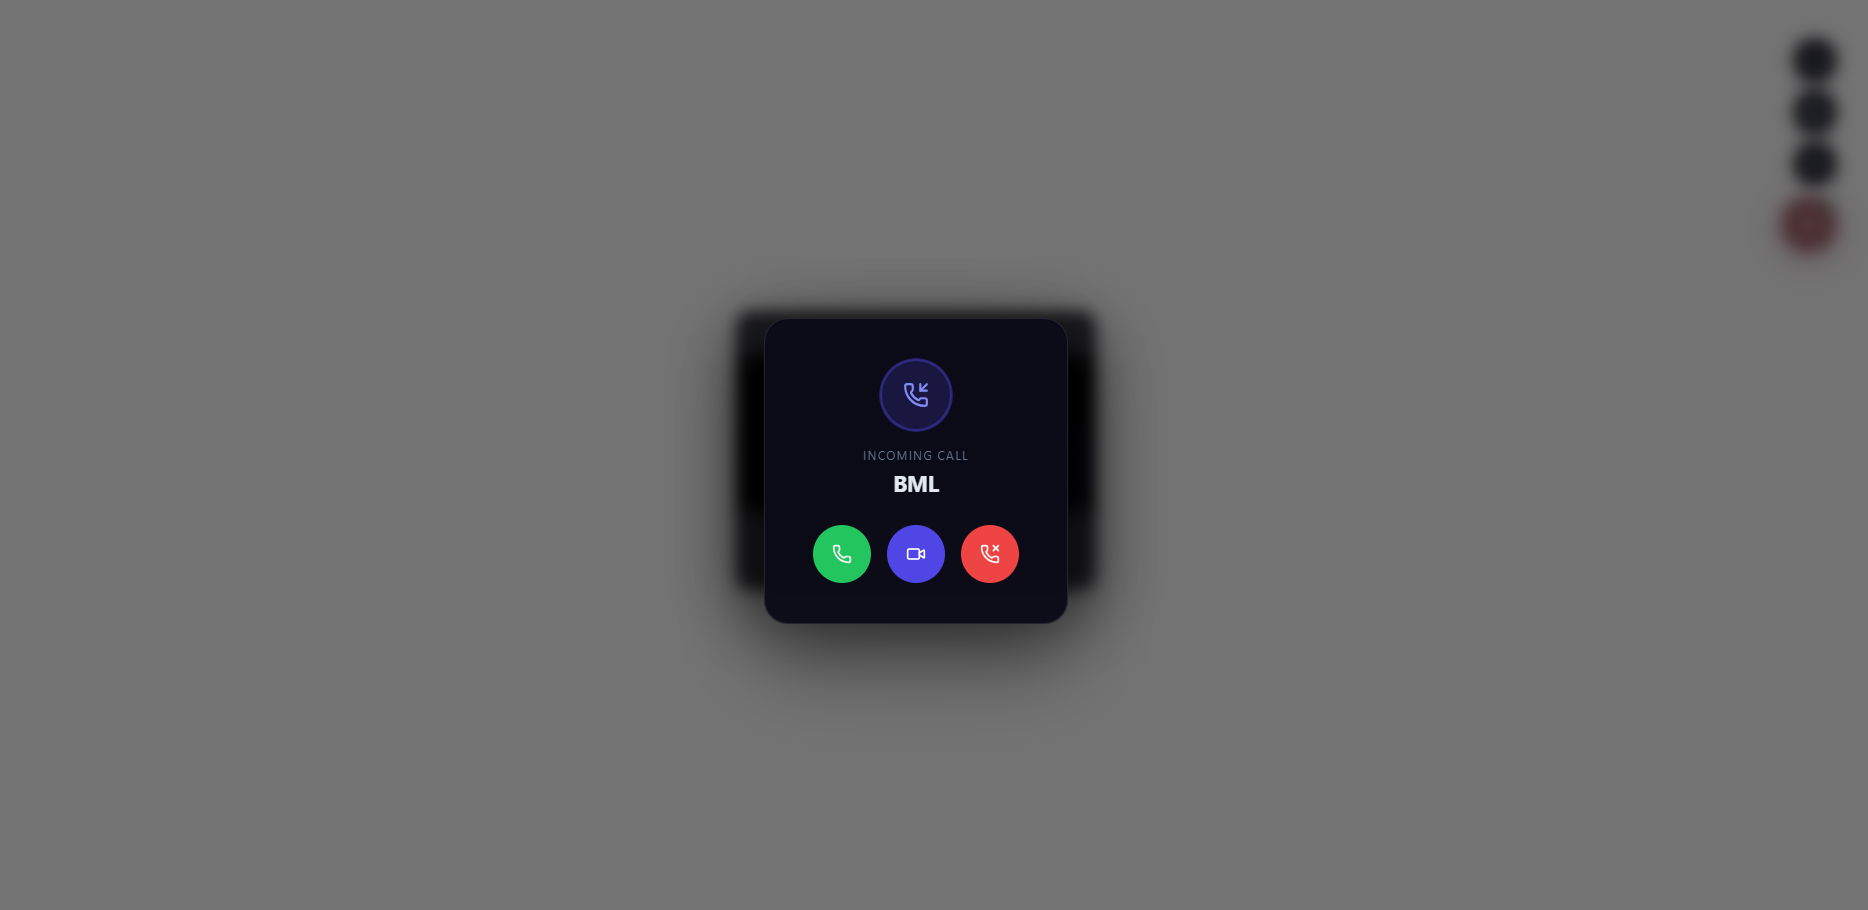
- 📞 Incoming call notifications with accept/reject
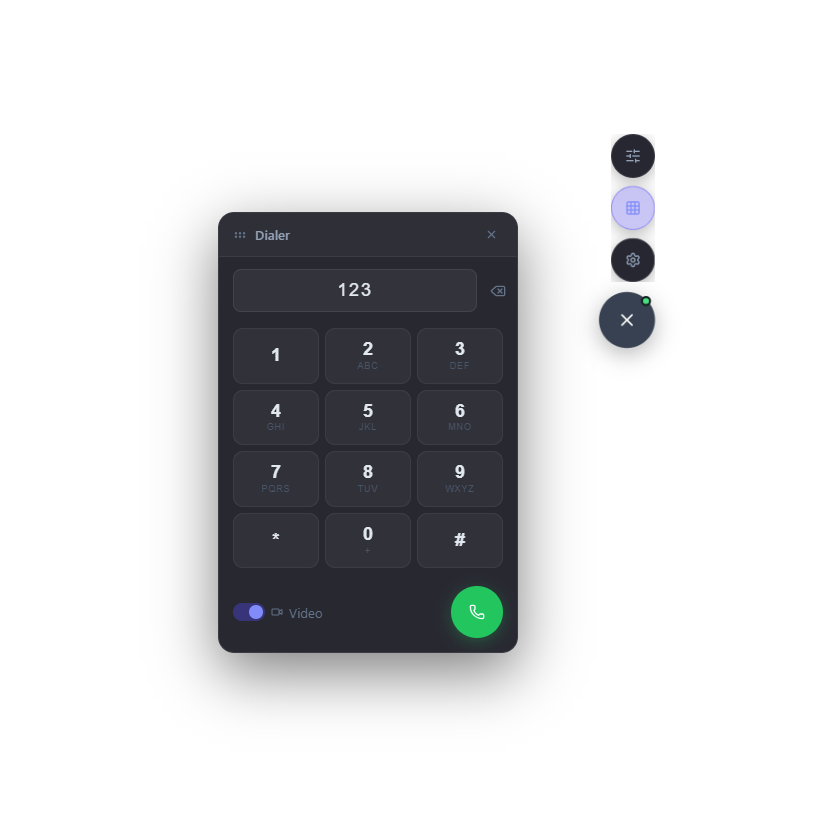
- 🪟 Draggable + resizable floating video panel (expandable to fullscreen)
- 🔢 Draggable dialpad panel
- 💾 Auto-saves config to
localStorageand auto-connects on reload - 🔄 Auto-reconnects on WebSocket disconnect
- 🌐 Transparent background — overlays any existing app
- 📡 Global
ksipcallAPI — trigger calls from plain JS or any framework - 🔒 ws:// / wss:// protocol selector
- 🎚 Audio & video codec selection
- 🔔 Ringtones for incoming and end call
- ⏱ Status toast notification with real-time connection state
- ⌨️ Keyboard shortcut (Ctrl+Shift+K) to toggle settings
Installation
npm install juv-ksip-softphoneQuick Start
import { Softphone } from 'juv-ksip-softphone';
import 'juv-ksip-softphone/styles';

function App() {
  return (
    <>
      <YourExistingApp />
      <Softphone />
    </>
  );
}
The softphone renders as a transparent overlay with a floating phone button (top-right). Click it to open the nav menu.
Props
SIP Connection Props
| Prop | Type | Default | Description |
|---|---|---|---|
server | string | "" | FreePBX server IP or hostname |
wsProtocol | ws | wss | "ws" | WebSocket protocol |
wsPort | string | "8088" | WebSocket port |
extension | string | "" | SIP extension number |
password | string | "" | SIP extension password |
displayName | string | "" | Caller ID display name |
Recording Props
| Prop | Type | Default | Description |
|---|---|---|---|
autoRecord | boolean | false | Enable automatic recording of all calls |
recordingDir | string | "video/recordings/Ksip" | Directory path for saved recordings |
uploadApiUrl | string | "" | API endpoint URL for uploading recordings |
Settings Configuration Props
| Prop | Type | Default | Description |
|---|---|---|---|
settingConfigToggles | object | all true | Controls which toggles are visible in settings UI |
settingConfigTogglesActiveState | object | varies | Sets initial active state for toggles |
settingConfigCodecs | object | all visible | Controls codec visibility and available options |
UI Props
| Prop | Type | Default | Description |
|---|---|---|---|
enableFloatingStatus | boolean | true | Show or hide the floating status toast (connected/disconnected) |
enabledBubble | boolean | true | Show or hide the entire softphone bubble |
showDialer | boolean | true | Show the dialer button in the FAB nav |
showSetting | boolean | true | Show the settings button in the FAB nav |
showOpacity | boolean | true | Show the opacity button in the FAB nav |
answerwithVideoCall | boolean | false | Auto-answer incoming calls with video |
ShowIncomingCallVideoBtn | boolean | true | Show the video answer button on incoming calls |
ShowIncomingCallAudio | boolean | true | Show the audio answer button on incoming calls |
Examples
Basic — manual config via settings panel
<Softphone />Pre-configured — auto-connect on load
<Softphone
  server="192.168.1.100"
  wsProtocol="ws"
  wsPort="8088"
  extension="1001"
  password="mypassword"
  displayName="John Doe"
/>
Full configuration
<Softphone
  server="192.168.1.100"
  wsProtocol="ws"
  wsPort="8088"
  extension="1001"
  password="mypassword"
  displayName="John Doe"
  enabledBubble={true}
  showDialer={true}
  showSetting={true}
  showOpacity={true}
  answerwithVideoCall={false}
  ShowIncomingCallVideoBtn={true}
  ShowIncomingCallAudio={true}
/>
Audio-only mode
<Softphone
  ShowIncomingCallVideoBtn={false}
  ShowIncomingCallAudio={true}
/>
wss:// for HTTPS pages
<Softphone
  server="pbx.yourdomain.com"
  wsProtocol="wss"
  wsPort="8089"
  extension="1001"
  password="mypassword"
/>
Settings Configuration
<Softphone
  settingConfigToggles={{
    bubble: true,
    dialer: true,
    settings: false,  // Hide settings toggle
    opacity: true,
    autoAnswerVideo: true,
    answerButtonVideo: false,  // Hide video answer button toggle
    answerButtonAudio: true,
    fullscreen: true,
    autoRecording: true,
  }}
  settingConfigTogglesActiveState={{
    bubble: true,
    dialer: true,
    settings: true,
    opacity: true,
    autoAnswerVideo: true,  // Start with auto-answer video ON
    answerButtonVideo: true,
    answerButtonAudio: false,
    fullscreen: false,
    autoRecording: true,  // Start with recording ON
  }}
  settingConfigCodecs={{
    audio: {
        visible: true,
    },
    video: {
        visible: false,
    },
  }}
/>
Auto Recording with API Upload
<Softphone
  autoRecord={true}
  recordingDir="video/recordings/Ksip"
  uploadApiUrl="https://your-domain.com/api/recordings/upload"
/>
Complete Example with All Features
<Softphone
  // SIP Connection
  server="192.168.1.100"
  wsProtocol="ws"
  wsPort="8088"
  extension="1001"
  password="mypassword"
  displayName="John Doe"

  // UI Controls
  enabledBubble={true}
  showDialer={true}
  showSetting={true}
  showOpacity={true}
  answerwithVideoCall={false}
  ShowIncomingCallVideoBtn={true}
  ShowIncomingCallAudio={true}
  fullscreen={false}

  // Recording
  autoRecord={true}
  recordingDir="video/recordings/Ksip"
  uploadApiUrl="https://your-domain.com/api/recordings/upload"

  // Settings Configuration
  settingConfigToggles={{
    bubble: true,
    dialer: true,
    settings: true,
    opacity: true,
    autoAnswerVideo: true,
    answerButtonVideo: true,
    answerButtonAudio: true,
    fullscreen: true,
    autoRecording: true,
  }}
  settingConfigTogglesActiveState={{
    bubble: true,
    dialer: true,
    settings: true,
    opacity: true,
    autoAnswerVideo: false,
    answerButtonVideo: true,
    answerButtonAudio: true,
    fullscreen: false,
    autoRecording: true,
  }}
  settingConfigCodecs={{
    audio: { visible: true, codecs: ["PCMU", "PCMA", "opus"] },
    video: { visible: true, codecs: ["VP8", "H264"] },
  }}
/>
ksip.status Component
The <ksip.status /> component allows you to render the SIP connection status inline anywhere in your application. It listens to the global SIP connection state and displays a banner or inline text.
By default, if connected, it will show the status for 5 seconds and then hide itself. If disconnected or reconnecting, it stays visible.
Usage
import { Softphone, ksip } from 'juv-ksip-softphone';

function MyHeader() {
  return (
    <header>
      <h1>My Application</h1>
      {/* Renders an inline status indicator */}
      <ksip.status variant="inline" />

      {/* Renders a full-width banner */}
      <ksip.status variant="banner" />
    </header>
  );
}
ksipcall API
The ksipcall global lets you trigger calls from anywhere — plain JavaScript, Vue, Angular, or any other framework.
Audio Call
ksipcall.audio("123");Video Call
ksipcall.video("123");Via window (plain HTML)
<button onclick="ksipcall.audio('123')">Call Support</button>
<button onclick="ksipcall.video('456')">Video Call</button>
Import in React
import { ksipcall } from 'juv-ksip-softphone';
ksipcall.audio("123");
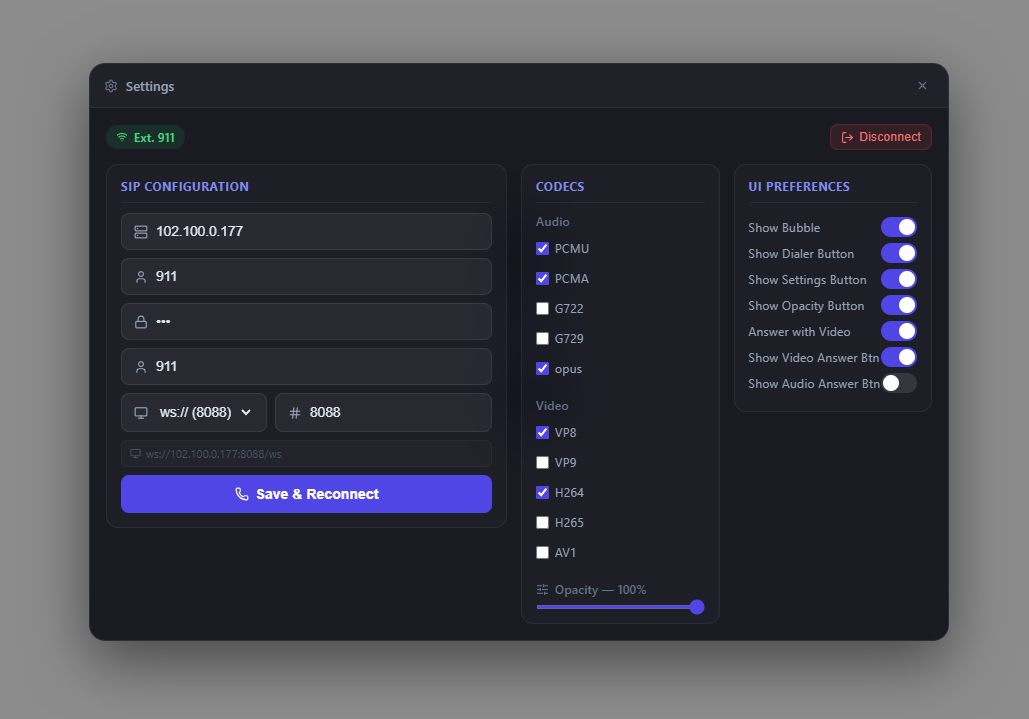
ksipcall.video("123");Settings Panel
The in-app settings panel (accessible via the ⚙ button) has a 3-column layout.
Column 1 — SIP Configuration
| Field | Description | Example |
|---|---|---|
| FreePBX Server IP | IP or hostname | 192.168.1.100 |
| Extension | SIP extension number | 1001 |
| Password | Extension SIP password | mypassword |
| Display Name | Caller ID name (optional) | John Doe |
| Protocol | ws:// or wss:// | ws:// |
| Port | WebSocket port | 8088 |
Column 2 — Codecs
Audio: PCMU, PCMA, G722, G729, opus
Video: VP8, VP9, H264, H265, AV1
Column 3 — UI Preferences
- Show Bubble
- Show Dialer Button
- Show Settings Button
- Show Opacity Button
- Answer with Video
- Show Video Answer Button
- Show Audio Answer Button
CDN Usage (Browser)
Use directly in the browser via CDN — no build tools required.
1. Include scripts
<!-- Styles -->
<link rel="stylesheet" href="https://cdn.jsdelivr.net/npm/juv-ksip-softphone@1.0.35/dist/juv-ksip-softphone.css">

<!-- Softphone bundle -->
<script src="https://cdn.jsdelivr.net/npm/juv-ksip-softphone@1.0.35/dist/juv-ksip-softphone.cdn.js"></script>
2. Mount the softphone
<div id="softphone"></div>

<script>
  const { Softphone, createRoot, createElement } = window.JuvKsipSoftphone;
  createRoot(document.getElementById('softphone')).render(
    createElement(Softphone, {
      server: "192.168.1.100",
      wsProtocol: "ws",
      wsPort: "8088",
      extension: "1001",
      password: "mypassword",
      displayName: "John Doe"
    })
  );
</script>
3. Trigger calls via ksipcall (CDN)
<button onclick="window.ksipcall.audio('1002')">Audio Call</button>
<button onclick="window.ksipcall.video('1002')">Video Call</button>
WebSocket Protocol
| Protocol | Port | Use Case |
|---|---|---|
ws:// | 8088 | Local network, HTTP pages |
wss:// | 8089 | Production, HTTPS pages (requires SSL cert on FreePBX) |
ws:// when the page is served over https://. Use wss:// with a valid SSL certificate for production.FreePBX / Asterisk Requirements
For WebRTC to work, each SIP extension must have these settings:
| Setting | Value |
|---|---|
webrtc | yes |
use_avpf | yes |
media_encryption | dtls |
ice_support | yes |
bundle | yes |
rtcp_mux | yes |
dtls_setup | actpass |
Enable via CLI
[1001](+)
webrtc=yes
asterisk -rx "pjsip reload"Auto Recording
The softphone supports automatic recording of audio and video calls with configurable save directory and API upload.
- ✅ Auto-record toggle in settings panel
- ✅ Configurable recording directory
- ✅ Saves as WebM format
- ✅ Automatic download after call ends
- ✅ Optional API upload with duplicate prevention
- ✅ Filename format:
{ISO-timestamp}.webm
Basic Usage
<Softphone autoRecord={true} />Custom Directory
<Softphone
  autoRecord={true}
  recordingDir="video/recordings/Ksip"
/>
With API Upload
<Softphone
  autoRecord={true}
  recordingDir="video/recordings/Ksip"
  uploadApiUrl="https://your-domain.com/api/recordings/upload"
/>
How It Works
- When auto-record is enabled, a modal prompts user to select a directory
- Browser's File System Access API creates
video/recordings/Ksip/folder structure - Recordings save directly to selected folder without download prompts
- If API URL is configured, uploads to server (once per day to prevent duplicates)
- Browser remembers directory permission for future recordings
Convert to MP3
ffmpeg -i recording.webm -vn -ar 44100 -ac 2 -b:a 192k output.mp3localStorage
Config is automatically saved under the key sip_softphone_config and restored on next page load, including SIP credentials, WebSocket settings, codecs, recording settings, and UI preferences.
showSetting is never saved to localStorage — it is always controlled by props.{
"server": "192.168.1.100",
"extension": "1001",
"password": "mypassword",
"displayName": "John Doe",
"wsProtocol": "ws",
"wsPort": "8088",
"audioCodecs": ["PCMU", "PCMA"],
"videoCodecs": ["VP8", "H264"],
"enabledBubble": true,
"showDialer": true,
"showOpacity": true,
"answerwithVideoCall": false,
"ShowIncomingCallVideoBtn": true,
"ShowIncomingCallAudio": true,
"fullscreen": false,
"autoRecord": true,
"recordingDir": "video/recordings/Ksip",
"uploadApiUrl": "https://api.example.com/upload",
"hasDirectoryAccess": true
}Status Toast Notification
A floating status indicator appears at the top-center of the screen showing the current connection state:
| Status | Color | Behavior |
|---|---|---|
| Connected | 🟢 Green | Auto-hides after 5 seconds |
| Reconnecting | 🟡 Yellow | Stays visible until connected |
| Not Connected | 🔴 Red | Stays visible until connected |
- The status toast includes a settings icon button for quick access to the settings panel
- Automatically appears when the app loads
- Shows real-time connection status updates
- Always visible even when bubble is hidden (can be accessed via
Ctrl + Shift + K)
Connection Monitoring
The softphone includes robust connection monitoring to detect server failures:
- Automatic Re-registration: SIP registration refreshes every 10 minutes to maintain active connection
- Disconnect Detection: Immediately detects when WebSocket connection is lost
- Auto-reconnect: Attempts to reconnect every 3 seconds when connection is lost
- Unexpected Unregistration: Automatically attempts to re-register if server rejects registration
- Long-running Sessions: Maintains connection health even after hours of being connected without page reload
• App connected at 9:00 AM
• Server goes down at 9:30 AM (30 minutes later)
• Status toast immediately shows "Reconnecting..." (yellow)
• Auto-retry every 3 seconds
• When server comes back online → auto-reconnects → "Connected" (green)
Keyboard Shortcuts
| Shortcut | Action |
|---|---|
Ctrl + Shift + K | Toggle settings panel |
Backend API Example (Laravel)
The softphone automatically fetches caller profile data (avatar, name, age, address, mobile) using the /user/extension/{ext} endpoint. Below is an example of how to implement this in a Laravel application.
1. Define the Route (routes/web.php or routes/api.php)
Route::get('/user/extension/{ext}', [UserController::class, 'getByExtension']);2. Create the Controller
<?php

namespace App\Http\Controllers;

use App\Models\User;
use Illuminate\Http\JsonResponse;

class UserController extends Controller
{
    public function getByExtension($ext): JsonResponse
    {
        // Find the user by their SIP extension
        // Assuming your users table has an 'extension' column
        $user = User::where('extension', $ext)->first();

        if (!$user) {
            return response()->json(['error' => 'User not found'], 404);
        }

        // Return the exact data structure expected by the Softphone component
        return response()->json([
            'name'          => $user->name,
            'avatar'        => $user->avatar_url ?? null, // Absolute URL to image
            'age'           => $user->age ?? null,
            'address'       => $user->address ?? null,
            'mobile_number' => $user->mobile_number ?? null,
            'extension'     => $user->extension,
        ]);
    }
}